
CONTENTS
My little cloud identity provider
Thank you for reaching out to Sigma Software!
Please fill the form below. Our team will contact you shortly.
Sigma Software has offices in multiple locations in Europe, Northern America, Asia, and Latin America.

USA

Sweden

Germany

Canada

Israel

Singapore

UAE

Australia

Austria

Ukraine

Poland

Argentina

Brazil

Bulgaria

Colombia

Czech Republic

Mexico

Portugal

Romania

Uzbekistan
8 min read
Hardly anyone of us, developers, haven’t yet heard anything about the Azure cloud platform. I am pretty sure that those who used it were satisfied, since one-click publishing, scaling, etc., make it easy and handy to use even for those who hate configuration routine.
The current article is dedicated to, I guess, less common use-case of Azure and covers yet unspoken details of applying Azure as an identity and access management service, which, in my opinion, isn’t really intuitive to use and configure and has many nuances.
Almost every Microsoft stack developer (and even a user) has interacted in one way or another with Active Directory Federation Services (AD FS), which is the standard component of the Windows Server and has lots of features and painful configuration, but in general, it handles identity, rights, and access for enterprise users.
I guess it is evident that Microsoft had to provide a cloud version of this miracle for their beloved developers and obviously, they named it Azure Active Directory.
At this point we have the first trap, because even being called Active Directory, Azure AD is just a completely different product. Do not expect it to have the same stack of features and especially the configuration process.
I must confess that this article is actually inspired by stump and traps we faced during a recent attempt to integrate our application with Azure AD in the scope of our cloud migration strategy. Even though this attempt appeared to be successful in the end, it was impossible without direct support from Microsoft, since official documentation in its current state does not cover necessary details.
So, for some earthly reason, you have decided to make your app working with Azure AD. Great!
Surely you should take a look at developers guides and code samples at first, and if you obediently follow these instructions, there is a high risk that your sample app will work and you will be proud of yourself.
At this point of success, you will experience receiving the following collection of claims, the so-called core, and basic claim sets united:
Table 1: Core + Basic claims for WS-Federation
Table 2: Core + Basic claims for Open Id Connect
| 1 | Aud | 2623fbe9-ce2e-4c58-b9cf-1444d8c53432 |
| 2 | Iss | https://sts.windows.net/eeac0adc-7b26-4ee9-baa3-fc36cadb8c48/ |
| 3 | Iat | 1519576780 |
| 4 | Nbf | 1519576780 |
| 5 | Exp | 1519580680 |
| 6 | http://schemas.microsoft.com/claims/authnmethodsreferences | pwd |
| 7 | c_hash | UnHknSfiwNiH-wVacaYXIg |
| 8 | Ipaddr | 93.76.211.122 |
| 9 | Name | admin |
| 10 | Nonce | 636551738755287597.ZGNkM2U1NjctOWFhYi00YzUyLTg2NjEtM2Y0MmZiZjJhYzA1ZmQ4YmIxY2QtMzI1Ni00NjE1LWI4ODctOGMzZGVhOTE5NWQ4 |
| 11 | http://schemas.microsoft.com/identity/claims/objectidentifier | 2fc8ea78-43ff-497f-b632-a0c860fdbb7f |
| 12 | http://schemas.xmlsoap.org/ws/2005/05/identity/claims/nameidentifier | DiUsVvMjCsxftUB3W1IFyA8V92qMQKyrZpSaJY7TLK4 |
| 13 | http://schemas.microsoft.com/identity/claims/tenantid | eeac0adc-7b26-4ee9-baa3-fc36cadb8c48 |
| 14 | http://schemas.xmlsoap.org/ws/2005/05/identity/claims/name | admin@nicklausbrainhotmail661. onmicrosoft.com |
| 15 | http://schemas.xmlsoap.org/ws/2005/05/identity/claims/upn | admin@nicklausbrainhotmail661. onmicrosoft.com |
| 16 | Uti | qY5TmnOubU-lB54WNn8MAA |
| 17 | Ver | 1 |
In fact, it is not hard to notice that most of these claims are technical ones and aren’t really useful. Even though we received the identity of the user (http://schemas.xmlsoap.org/ws/2005/05/identity/claims/name), we can hardly have anything more than simple discretional access control based on this identity.
We need a way to get more information about our user, so that we could implement a more sophisticated access control model, personalize user experience, and introduce additional functionality.
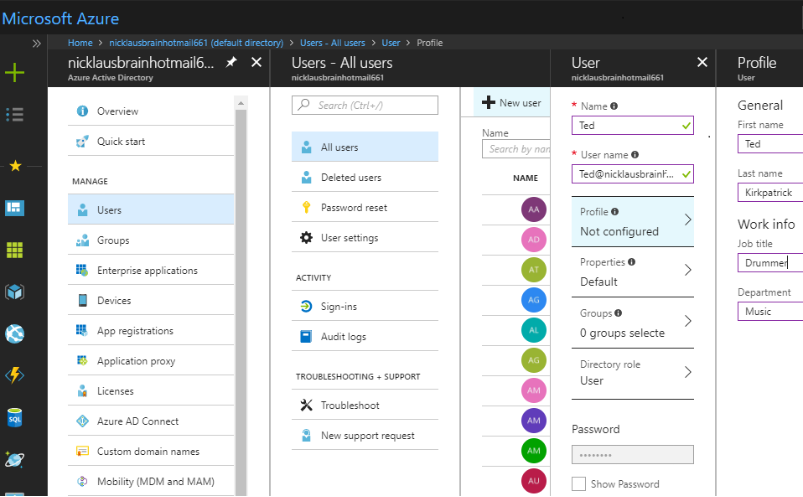
When creating a new user or modifying their profile, you see a lot of optional attributes available for specification (Image 1) including first and last names, department, email, and others.
Image 1: Creating a new user
 ” width=”364″ height=”24″ />
To get these user’s attributes as claims you will need to create a so-called “claims mapping policy” according to official instructions (https://docs.microsoft.com/en-us/azure/active-directory/active-directory-claims-mapping), but beware since there is another unexpected trap: just after you assign the claims mapping policy to your service principal, you will experience the following error during an authentication procedure:
AADSTS50146: This application is required to be configured with an application-specific signing key. It is either not configured with one, or the key has expired or is not yet valid. Please contact the application’s administrator.
We have spent a lot of time trying to figure out how to configure such a key, but in the end, Microsoft support ended our suffering with the following instructions (missed in official claims mapping manual):
{
“keyCredentials”:
[{
“startDate”: “2018-02-22T01:10:00Z”,
“endDate”: “2019-02-22T01:10:00Z”,
“type”: “X509CertAndPassword”,
“usage”: “Sign”,
“keyId”: “100C8EC2-0011-490c-86A2-3BF89A708456”,
“value”: “Content of pfxbytes.txt”
}],
“passwordCredentials”:
[{
“startDate”: “2018-02-22T01:10:00Z”,
“endDate”: “2019-02-22T01:10:00Z”,
“keyId”: “100C8EC2-0011-490c-86A2-3BF89A708456”,
“value”: “Password for the PFX file”
}]
}
Note that “startDate” and “endDate” must match the real dates of the certificate. “keyId” must be the same for both “keyCredentials” and “passwordCredentials” (you can use any GUID generator to provide its value).
If you want not to bother with the signing keys and certificates there is an alternative (but unspoken) way to overcome AADSTS50146 error.
First of all, you should set the switch “acceptMappedClaims”: true in your app registration manifest.
Secondly, you need to add and verify your application domain in “Custom domain names” blade of Azure AD (Image 2). Domain verification means that your domain must be accessible through the internet and you must publish a special TXT file with the secret key on this domain, so that Azure AD can check that this domain belongs to you.
Surely, you are wondering if it is possible to at least test your application without publishing it to a valid internet domain. The answer is yes, since Azure AD always has the default verified domain that belongs to the directory itself (see admin@nicklausbrainhotmail661. onmicrosoft.com on Image 2), registering this domain in your “hosts” file will do the job:
127.0.0.1
nicklausbrainhotmail661. onmicrosoft.com
Image 2: Custom domain names
![]()
Surely, you have already noticed the Groups blade in Azure AD menu, and perhaps configured several ones (Image 3):
Image 3: Groups blade
![]()
And again, you will not get information about user groups automatically. The access to group claims is configured through the app registration manifest using the following switch:
“groupMembershipClaims”: null
This switch is a bitmask with the following values acceptable:
Table 3: Acceptable values for “groupMembershipClaims” switch
| Value | Description |
| 0 | None |
| 1 | Security groups and Azure AD roles |
| 2 | Reserved for future use |
| 4 | Reserved for future use |
| 7 | All the security groups, distribution groups, and Azure AD directory roles that the signed-in user is a member of |
It is remarkable that there is no need to verify your application domain in order to get group membership claims. The only issue here is the format, in which you receive these claims:
http://schemas.microsoft.com/ws/2008/06/identity/claims/groups 73bbf1f8-633a-4d00-81de-e768148dfff7
http://schemas.microsoft.com/ws/2008/06/identity/claims/groups a69ea50f-6cac-4aca-8baf-eab048310061
http://schemas.microsoft.com/ws/2008/06/identity/claims/groups d90d8972-859f-46c2-b9cd-7bd3c451f46b
Instead of receiving group names, you get Object ID of each group assigned to a user in Azure AD. Nevertheless, it is enough to identify them unambiguously.
Note that group claim (http://schemas.microsoft.com/ws/2008/06/identity/claims/groups) is impossible to receive or override through claims mapping policy.
Azure AD provides roles separation as well, even though their configuration is not that intuitive as of groups.
For a start, define a set of roles in your application manifest:
“appRoles”: [
{
“allowedMemberTypes”: [
“User”
],
“displayName”: “User”,
“id”: “0f7d16a6-8a2a-4eed-9bd2-64221d9b02a8”,
“isEnabled”: true,
“description”: “User can do anything allowed by admin”,
“value”: “User”
},
{
“allowedMemberTypes”: [
“User”
],
“displayName”: “Admin”,
“id”: “0f7d16a6-8a2a-4eed-9bd2-64221d9b02a7”,
“isEnabled”: true,
“description”: “Admin can do anything”,
“value”: “Admin”
}
],
Then, you will need to access “Enterprise applications” blade and list all the application through an appropriate menu (Image 4):
Image 4: Listing Enterprise applications
![]()
Open your target app and proceed to “Users and groups” menu (Image 5):
Image 5: Users and groups menu
![]()
Here you should assign all necessary Azure AD users to your app. Note that groups assignment is not available for a free subscription. Assigning the users or groups, you should select their roles (Image 6), and that is it!
Image 6: Role selection
![]()
Azure AD will send you role claims allowing you to implement role-based access control model:
http://schemas.microsoft.com/ws/2008/06/identity/claims/role Admin
Cloud migration may lose its benefits having no handy method to transfer existing data and configuration. Fortunately, there is an easy way to move your existing on-premises Active Directory user base into Azure, since Microsoft provides a special application for that purpose called Azure AD Connect. Please refer to its official manual if you are interested in it. Personally, I found it useful and had no trouble in configuring it, at least for my use-case.
Azure Active Directory provides a nice alternative to on-premises directories being globally available, providing support of primary authentication protocols, and being powerful enough even in its free version.
Existing integration tools, such as Azure AD Connect and Application Proxy, are making it great in providing integration with existing on-premises solutions.
Its configuration and features are flexible in general, but at the same time obscure in many parts and unfortunately, the existing documentation does not yet cover essential nuances, presumably because it is still in active development.
I sincerely hope this article was interesting and useful for you and saved a bit of your time.

Nikolay is an advanced .NET developer working with Sigma Software for many years. He is passionate about technology and its progress, so Nikolay actively participates in tech community events, acts as a mentor and trainer, competes and takes high places at international Hackathons.


Biotech executives face a massive data problem. The issue is not gathering information. The issue is making that information useful. Clinical trials slow down b...

Healthcare leaders need to switch from billing for services to getting paid for patient health. Artificial intelligence offers specific tools to manage this shi...

AI success in manufacturing depends on more than accurate predictions. In environments where quality, safety, and traceability shape daily operations, predictio...