
USA
Thank you for reaching out to Sigma Software!
Please fill the form below. Our team will contact you shortly.
Sigma Software has offices in multiple locations in Europe, Northern America, Asia, and Latin America.
USA

Sweden

Germany

Canada

Israel

Singapore

UAE

Australia

Austria

Ukraine

Poland

Argentina

Brazil

Bulgaria

Colombia

Czech Republic

Hungary

Mexico

Portugal

Romania

Uzbekistan
7 min read
Every developer who worked with iOS BLE knows that not everything is so good as it’s described in documentation. And today, I would like to describe a few main points that can be tricky when working with BLE. I would like to provide some information for you, reader and I guess BLE-developer, to make your journey in Cocoa BLE world less painful and more productive.
Abbreviations (in order of appearance in text):
BLE – Bluetooth Low Energy
PCB – Printed circuit board
API – Application Programming Interface
So, the very first thing you need to know is the answer to the question ”Where exactly something goes wrong – on my side or on the connected device? Does something happen when I send a command to the device?”
To get an answer to this question I recommend to use a few approaches:
So, let’s discuss every point in more details.
Sniffer tool – this a tool that allows you to intersect data packets and analyze them without CoreBluetooth framework. It can be very helpful to distinguish different aspects of BLE communication – requests, responses, unhandled error, unexpected messages, etc. To setup such tool, you basically need several things: special pcb and firmware to your Mac. I used Wireshark and Nordic Semiconductors test board. Together they provide a powerful toolset for sniffing activities.
Sniffer tools can be used in two modes – advertisement and connection.
Useful links are:
(https://www.nordicsemi.com/Software-and-tools/Development-Tools/nRF-Sniffer-for-Bluetooth-LE )
(https://www.xquartz.org/releases/XQuartz-2.7.8.html)
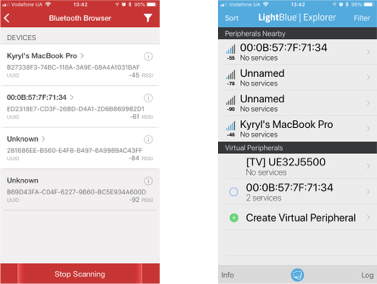
3rd party apps for testing API – one of the fastest ways to test your device is to use 3rd party solutions. With such products you can easily scan, discover, send/receive, or even simulate some functionality of your device. Great examples are
Logging – most BLE devices talk to a smartphone on the other end. Because of this, understanding what’s happening on the phone itself can be critical. One of the most useful techniques for checking what’s happening on the phone is to use the operating system’s own logging capabilities.
In iOS, enabling Bluetooth logging requires installing a special profile in the device. You can find more information on enabling it at https://developer.apple.com/bluetooth/
Once enabled, iTunes can sync the logs to a computer and they can be analyzed.
Firmware – to protect own product it’s common to use an encrypted protocol of communication between app and device. Such approach ensures a higher security level for a user, but at the same time is much harder in terms of development. To simplify this process, always use an unencrypted version of firmware during development and include an additional level of security only for production purposes. This, of course, affects firmware development time a little bit, but this also reduces efforts required from your side to develop a great app using such firmware.
At this point, I assume that development environment is up and running, and all you need is just to make your hands dirty and write some code to bring life to the app :).
Now, to make sure your user gets best UX you should fully control Bluetooth environment inside your app and, correspondingly, all aspects of it. Basically, you should think about the following points:
I won’t describe all aspects of each point in the list above, instead I will give you some advice for them.
Status observation – luckily for us, iOS may work with a few devices at the same time and so with a few objects that can handle work with Bluetooth devices. And of course we will use this possibility. One approach is to prepare a simple device scanner – this will allow you to be notified when a Bluetooth device is up and running and vise-versa. This approach is simple and effective and may be as follows:
import Foundation import CoreBluetooth final class BLEStatusObserver: NSObject { public struct Notifications { public static let BLEStatusObserverDidDetectBLEStatusChange = “BLEStatusObserverDidDetectBLEStatusChangeNotification” struct Keys { static let availability = “availability” static let message = “message” } } static let observer = BLEStatusObserver() var isBleDeviceActive:Bool { return currentState == .poweredOn } private var centralManager:CBCentralManager? private var currentState:CBManagerState = .unknown // MARK: – LifeCycle override init() { super.init() centralManager = CBCentralManager(delegate: self, queue: nil) } } extension BLEStatusObserver:CBCentralManagerDelegate { // MARK: – CBCentralManagerDelegate func centralManagerDidUpdateState(_ central: CBCentralManager) { var notificationMessage:String? = nil switch central.state { case .unauthorized: notificationMessage = dynamicLocalizableString(“bleService.message.StatusUnathorized”) case .unsupported: notificationMessage = dynamicLocalizableString(“bleService.message.Unsupported”) case .poweredOff: notificationMessage = dynamicLocalizableString(“bleService.message.PowerOff”) case .poweredOn: notificationMessage = dynamicLocalizableString(“bleService.message.PowerOn”) default: break } currentState = central.state NotificationCenter.default.post(name: NSNotification.Name(rawValue: BLEStatusObserver.Notifications.BLEStatusObserverDidDetectBLEStatusChange), object: nil, userInfo: [ Notifications.Keys.availability : central.state == .poweredOn, Notifications.Keys.message : notificationMessage ?? “” ]) } }
Timeout – timeout for BLE requests is not handled by CoreBluetooth by default, so you should implement such a mechanism by yourself. And here is the place where you can use all your creativity within project requirements. The only thing that I guess you need to know – yes, timeout is required.
Another useful point may be the knowledge of the data packet transferring speed and dependencies. Someone has already prepared tests on real devices (like this one – https://punchthrough.com/blog/posts/maximizing-ble-throughput-on-ios-and-android ), you may also want to check out an official Bluetooth doc (like this one – http://people.csail.mit.edu/rudolph/Teaching/Articles/BTBook.pdf). I suppose that this time may depend on several things:
Taking this into account, I suggest to start within 70-100 ms as a start point and adjust it based on your needs.
Multiline response – some firmware may return a few lines of response for specific requests (because of the packet size limitation or realization or another reason). In this case, I would like to suggest to agree on the exact protocol of communication and structure of each request/response. For example, it may be something like this:
Such approach is very simple and, believe me, very effective. If you implement this behavior, you may even have better sleep at night 🙂
One more point – make sure you execute 1 request at a time. To use such an approach, NSOperationQueue may be very helpful. I will not dive into details of realization, but I want to emphasize that you should create some kind of AsyncOperation to properly handle all cases. (maybe this – https://gist.github.com/calebd/93fa347397cec5f88233 🙂 )
Backgrounding – this is interesting. Seriously, very interesting. You should read all available documentation, and then do it again. A lot of things are tricky. I can’t describe all tricky parts here, I guess this is a question for a separate article (what about this one – https://www.cloudcity.io/blog/2015/06/11/zero-to-ble-on-ios-part-one/).
All you need to know about backgrounding within CocoaTouch – it works, but sometimes it may work not as you expected. In this case, there is only one solution – read the documentation again.
Huh, I guess now you can start coding 🙂 (hopefully).
References
Apple Developer – Core Bluetooth Programming Guide
https://developer.apple.com/bluetooth/
WWDC 2012 Videos – Core Bluetooth 101
https://developer.apple.com/videos/wwdc/2012/#703
WWDC 2012 Videos – Advanced Core Bluetooth
https://developer.apple.com/videos/wwdc/2012/#705
WWDC 2013 Videos – Core Bluetooth
https://developer.apple.com/videos/wwdc/2013/#703
Tutorials
https://www.cloudcity.io/blog/2015/06/11/zero-to-ble-on-ios-part-one/
Gists
https://gist.github.com/calebd/93fa347397cec5f88233
Sniffer tool:

Kyryl is an advanced iOS developer working with various programming languages (Objective-C, Swift, C++, C#, etc.). He has a vast experience in mobile development using most well-known third-party libraries and tried his hand in desktop development for OS X. He thinks that solving challenges in his job is the most interesting part.

At Sigma Software, we constantly explore how emerging technologies can amplify engineering efficiency. Recently, a team from Sigma Software that develops Dovkol...

Connected vehicles generate enormous amounts of data, but accessing real-world fleets for testing is costly, time-consuming, and often impractical in the early ...

On November 27, in Lviv, Forbes AI Summit brought together entrepreneurs, technology leaders, and scientists for an honest conversation about how AI is reshapin...
