Let's discuss Espresso for Android. What is its use for a test automation engineer? What drawbacks does the tool have?
What is Espresso in the first place?
It is a tool for testing the UI of Android applications developed and supported by Google. Although this tool is positioned more as an Android developer’s tool for white/grey-box testing, it can be quite efficiently used by test automation engineers for grey/black-box as well.
What is Espresso use for a test automation engineer?
It can shift UI tests from their sad place at the top of the testing pyramid a bit closer to its base – as most UI tests are slow and costly (see https://martinfowler.com/bliki/TestPyramid.html).
So how is Espresso different from competitors?
- It is fast. No, it`s not the word – it is actually very fast – the fastest on the market.
- It is reliable. The number of its accidental test fails is a lot smaller than, for instance, for UIAutomator or Appium. Which means that the analysis of failed tests (whether relevant or accidental) will cost less. This difference will be especially valuable for Android, where its hardware fragmentation and numerous OS versions make it necessary to run the same test on a bunch of various configurations.
Visual comparison of different tools according to their speed and reliability looks like this (the values are taken from [3]):
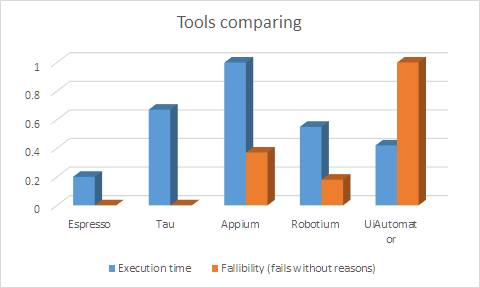
Note to the diagram: “Fallibility = 1 for UIAutomator does not mean that 100% tests fail with it, instead, it means that this tool with the highest number of fails was taken for 100%. If we take the absolute ratio of failed tests to launched tests, for UIAutomator it is 7.58%, and for Espresso it is 0.06%. These 7.85% do not look like a huge number, but if the number of tests is, say, 500, about 40 tests will fail, and dealing with all 40 will take time.
- There is no problem with coding wait processing for UI elements. None at all. It is enough to write just something like (onView(withId(R.id.addToDoItemFAB))).perform(click()) – and the button will be tapped the moment it appears and is ready for tapping. No sooner and no later. There is no need to write any custom waits, syncs, sleeps, and polls. All the wizardry, which Google calls “synchronization”, happens without our involvement.
- Quick start. All the tools necessary to “make PoC” are free of charge and quite user-friendly for people who have never dealt with Android tools before.
Espresso Drawbacks:
- There is a risk to get used to the in-built test synchronization and UI – then it might be hard to work with WebDriver.
- It requires access to the application’s source code. Without the source code, you won’t be able to do anything.
- Narrow focus. If UI tests are required for both Android and iOS, it will be necessary to write twice, for two different systems. If tests require to work with Android outside the application (for example, open a received notification with a text message), you’ll have to use additional tools, such as UIAutomator.
- It is desirable to have at least minimal experience of building and launching Android applications on emulators.
Useful docs on applying Espresso for test automation:
- https://developer.android.com/training/testing/espresso/index.html – a document from Google
- http://jultika.oulu.fi/files/nbnfioulu-201706142676.pdf – fundamental research on Espresso vs Tau vs Appium vs Robotium vs UIAutomator
How to try Espresso “from scratch”:
- Install AndroidStudio (https://developer.android.com/studio/index.html) with AVD manager
- Download any simple open source Android application from github repository, for example, https://play.google.com/store/apps/details?id=com.dalviksoft.calculator. To find such open source applications you can enter “open source” or “github.com” into the search field on https://play.google.com/. Descriptions of the applications found will have links to github
- Open this repository in AndroidStudio, select Run->Record Espresso Test
- Tap the application and save the recorded test
- Try to run it 🙂 The chance that the entire recorded test will run is not high, but at least some steps should pass. Now you can check what the recorder has saved and refactor it to some working condition
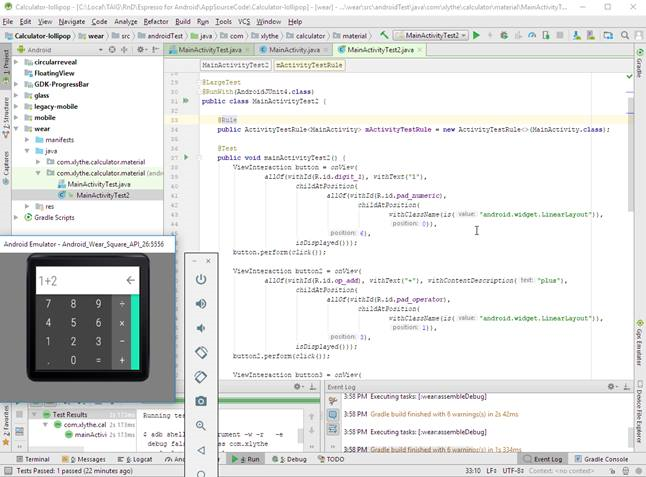
Below is a screenshot of Android Studio with Android Wear emulator open and calculator running. The Android Studio window shows the code that the recorder has generated for the simplest test case – “check that 1+2=3”.
After some refactoring the test will look as follows:
@Test
public void mainActivityTest2() {onView(withId(R.id.digit_1)).perform(click());
onView(withId(R.id.op_add)).perform(click());
onView(withId(R.id.digit_2)).perform(click());
onView(withId(R.id.eq)).perform(click());
onView(allOf(Matchers.instanceOf(android.widget.EditText.class),
withText("3"))).check(matches(isDisplayed()));- }
Espresso for Android for Test Automation: Conclusion
If the task is to cover an Android application with automated UI tests, and you have access to the application source code – Espresso will be the most optimal tool due to its speed and reliability.