Many of us have at least once faced integrations with 3rd party Services on our projects. We usually test such functionality manually, authorizing through such services as Google accounts and others. When it comes to API auto-tests, it often begs the questions: how can we automate this process? Which way of access token generation brings more benefits in case there is one integration... dozens of integrations?
OAuth 2.0 flow for Web Server applications
Ways of the authorization flow automation
In this article, I would like to describe the main ways of OAuth2 authorization during API tests implementation and their pros and cons. I hope it would be helpful for you.

In many cases the service accounts authorization is enough to get an access token for the tests. However, there are situations when we need to know who is logging in, what permissions the user has, etc. Here we need to use Web Server application authorization, which requires user’s actions. That is why the main topic of this article is OAuth 2.0 for Web Server applications.
OAuth 2.0 flow for Web Server applications
In general, OAuth 2.0 flow works as follows:
- The authorization sequence begins when your application redirects a browser to a 3rd party service authorization URL. The URL includes query parameters that indicate the type of access being requested, client ID, scope, redirect URL.
- 3rd party Service API handles the user authentication, session selection, and user consent.
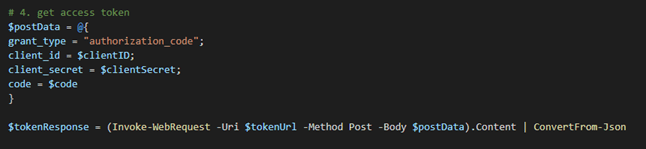
- The result is an authorization code, which the application can exchange for an access token and a refresh token.
The most problematic part of this flow for automation is the second point, because the implementation can vary depending on the service and we cannot control the way the service handles the user authentication. In addition, the user actions are required here.
Ways of the authorization flow automation
Basing on the project conditions, we can implement the OAuth2 authorization flow in two ways:
- Through HTTP requests only;
- In combination of HTTP requests and browser interaction.
Approach 1: HTTP requests usage
The main idea of this approach is to use HTTP protocol only for user authorization, including sending user credentials to the service.
Before the implementation, we need to collect the following information:
- Authorization URL (usually mentioned in the documentation of the 3rd party service);
- Token URL (usually mentioned in the documentation of the 3rd party service);
- Redirect URL (usually mentioned in the documentation of the 3rd party service);
- Scopes – resources that we want to get the access to (the list of supported scope usually mentioned in the documentation of the 3rd party service);
- Client ID;
- Client secret;
- Login;
- Password.
After we have all the required data, we can proceed with the flow implementation.
Below I will put an example of the authorization module for Box Service, implemented on PowerShell.
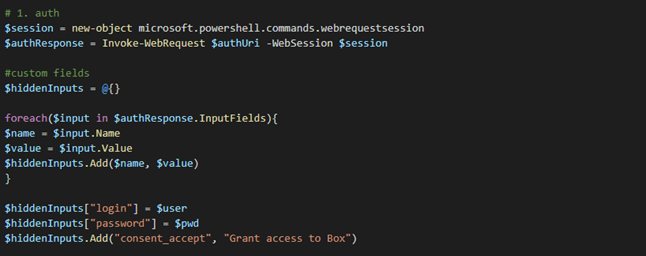
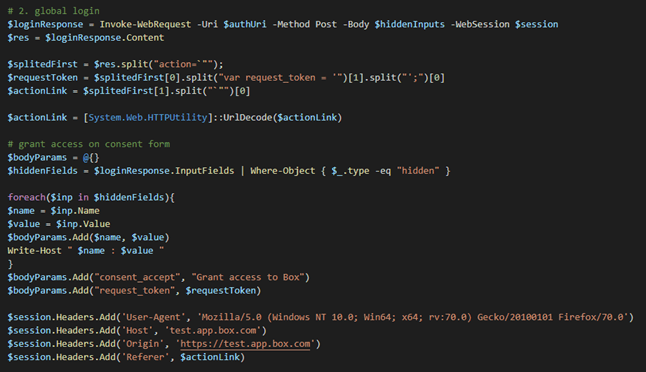
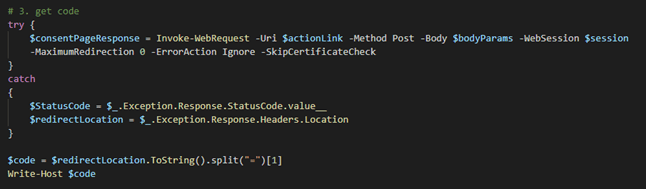
The most time-consuming part of this approach is related to the global user login and consent form, because we need to figure out how to pass user credentials to the request and what headers are required to make the request work.
Pros and Cons of HTTP Request Approach
| PROS | CONS |
|---|---|
| 1. Stability. The script works stable in comparison with the approach, where we interact with a browser. | 1. Time for implementation is quite long due to the features of OAuth2 implementation of a particular 3rd party service. |
| 2. Fast run. Since we do not set up the driver, it saves time during a script run. | 2. Requires sensitive information such as client_secret. |
| 3. Does not require additional settings in CI. |
Approach 2: HTTP requests and browser interaction
The main idea is to perform the most time-consuming part of Approach 1 by a web-driver.
The data to collect:
- Authorization URL (usually mentioned in the documentation of the 3rd party service);
- Token URL (usually mentioned in the documentation of the 3rd party service);
- Redirect URL (usually mentioned in the documentation of the 3rd party service);
- Scopes – resources that we want to get the access for (the list of supported scope usually mentioned in the documentation of the 3rd party service);
- Client ID;
- Login;
- Password.
You can find the UML diagram of this approach below:
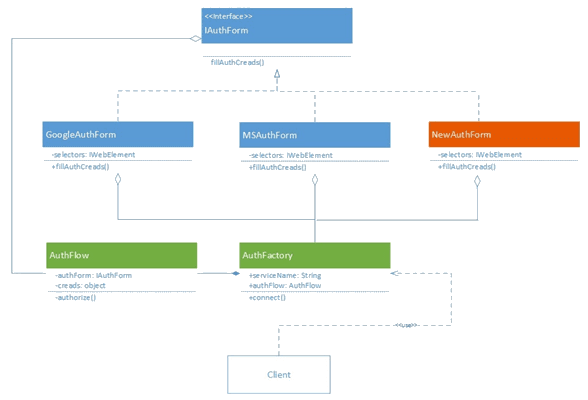
Fig. 1. UML diagram of Approach 2
Here the reusable classes are marked as green. The only thing you need to add to connect a new 3rd party service is the AuthForm page object for a corresponding service (class in orange on Fig. 1).
Pros and Cons of HTTP Requests and Browser Interaction Approach
| PROS | CONS |
|---|---|
| 1. Fast to implement. The most time-consuming part is implemented using a web-driver that makes the implementation process faster. | 1. Can take more time in runtime due to driver setup. |
| 2. Does not require sensitive information like client_secret. | 2. Requires additional containerization in CI. |
| 3. The flow is reusable. | 3. There is a risk of instability of the authorization process due to the driver setup. |
Both approaches have their own pros and cons and can be implemented as a part of a test automation solution. However, let us specify the conditions when we can get more benefits from using each of these approaches.Conclusions
If your project integrates with one 3rd party service, you can use HTTP requests only for authorization. You will spend more time for implementation in comparison with Approach 2, but it will happen just once. In addition, the solution will be stable and fast enough.
If there are two or more integrations with 3rd party services, the best option will be Approach 2, since it saves a lot of time during the implementation of the authorization mechanism.
If you do not have sensitive information or some specific data, required for authorization through the HTTP requests, it is better to use Approach 2 too, because all the attributes, required to send user credentials to the server, are prepared automatically in the browser during UI authorization.